Tuesday, February 26, 2008

Did I say Toorshi?

Back in the late 80s and early 90s, after a visit at my aunt’s or a trip to the heart of Hollywood for some Armenian event or another, my parents used to treat us kids by taking us to Zankou Chicken. Zankou back then wasn’t like the Zankou now famous in LA with several locations around town (they have a website now -what the ?). I remember it as a narrow “hole in the wall” no frills take-out on Sunset and Normandy (ok so it’s still no frills but it’s three times its original size) and inevitably Mr. Zankou (the late Mr. Iskanderian) would pop out from the back room and with the signature shrugging of his shoulders ask my dad “Have you heard the latest on Beirut?” We’d always get a plate of the shawerma and if we asked nicely in Armenian the ladies in yellow t-shirts, big hair, and turquoise mascara would give us extra pita bread.

What I really got excited about on those trips was the toorshi. Toorshi or Torshi - strips of pink, vinegary, garlicy turnips wrapped up in foil or tucked away in the corner of your plate. My sister and I would fight over them until we got wise enough to ask the ladies for more toorshi too.

Pickled turnips. Such a simple thing. Actually I had no idea they were turnips until a few years later. I can eat a bowl of these if you leave it in front of me. I hunted them down not long ago here in Paris. Once I picked up a jar of pre-made pickled turnips from an Arabic grocer near Belleville….oh I was disappointed. It was nothing like Zankou’s, nothing like my mom’s, it was just vinegar and turnips. Then I found Noura and they come pretty close. Since I wasn’t going to be satisfied by going to Noura every time I craved toorshi….I naturally had to make some too.

I was intimidated at first. Pickling doesn’t sound easy. It sounds like I need special equipment. Then after telling my friend about the bad jar from Belleville, she said “Set, it’s the easiest thing! I can even do it.” So I did it. They’re good. Hey my in-laws like them. J And I eat up a whole bowl of them if it’s in front of me…and more since I know they are in my fridge.

Toorshi – Pickled Turnips

Ingredients:

3-5 medium sized turnips
½ a medium beet*
1 stalk celery (or two celery leaves for a milder flavor)
4-6 gloves garlic (peeled and smashed with a side of knife) depending on how garlicy you want it
2 red thai chili pepper OR 1 teaspoon red Aleppo pepper flakes (optional)
1 tablespoon coarse sea or Kosher salt
1 cup white, distilled vinegar (5 % acidity)
1 cup water

For safety reasons, you can’t just be hayala (careless) about pickling. You should use very clean jars that have good lids. The best way to make sure they are really clean – boil them. Put them in a big pot of water and bring them to a boil then air-dry them or dry them with a really clean towel. I got two 750 ml or 25 oz jars of pickled turnips out of 3-5 medium turnips. Plus you have to use equal parts vinegar and water.

When your jars are ready, put the vinegar and the water into a pot and bring it to a boil. While it’s coming to a boil…

Peel the turnips and slice them into 1 cm wide, ½ cm thick strips (like the photo). They won’t be uniform but that’s ok. Slice up the beet half into similar strips but they can be wider and more hayala. * Regarding the beet - I use cooked beets. You can find pretty good ones in the fresh vegetables here in Paris tightly wrapped up in plastic, but even better ones at the marche from the middle eastern vendors. I have not used fresh, uncooked beets. I don't know if you're supposed to or not - and I don't bother boiling them myself cause it's really messy but you certainly should if you can't find decent pre-cooked beets easily.

At the bottom of the jars drop a smashed garlic clove and 1 of the thai chilis (or ½ the red pepper flakes). Layer the turnip and beet slices alternately (use more or less beets depending on how strong a pink color you want) in the sterilized jars. Sprinkle the salt as you go through. Midway through drop another garlic clove and the second half of the pepper. Cut the celery stalk to the length of the jar and push it in at one side or if you're using celery leaves drop them in here and there. Cover the turnips etc completely with the vinegar-water solution. No bits should be sticking out of the liquid. Let it cool down to just above room temperature (just so it's not steaming). Seal the jars with the lids and turn the jar upside down and then right side up to make sure all the spices and juices are evenly distributed. Place in the refrigerator. It should be ready in 7-10 days.


Sunday, February 17, 2008

Edjeh - An Herb Frittata of Sorts

Has it been two months already?! Where did the time go? The holidays came and went so fast I feel like the Roadrunner just ran past me and I am barely regaining my footing. Ooof.

We spent the holidays in sunny, beautiful LA with a full house of sisters, brother-in-law, a hyperactive toddler and an all-too-cute infant. Plus the seemingly endless procession of aunts, uncles, cousins and their children!! Chaos abound!! I loved it. I miss it already.

I picked up a few things from being back home. First of all – I realized that recipes don’t necessarily translate that easily across borders. My cousin gave my pear cake recipe a try for one of our family “soorj” (coffee) gatherings. Turns out French flour and American flour ain’t quite the same thing and the poor cake came out heavy and dense. That was my fault. I had the reverse problem when I first tried to bake cookies and cakes from American recipes here in Paris. Everything I tried would sink like a bad soufflĂ©! With a bunch of trial and error I learned to use cake flour (which is lighter and has an added leavening ingredient) for some recipes and more flour for other recipes. I thought about how to fix it and added some ideas to the original post.

Second – my mom, a bit encouraged by my interest in her cooking, actually taught me how to make some of my favorite dishes.

Now we’re am back to our quiet, organized tiny apartment in the heart of Paris, back to relying on my own two feet to get around, back to grey skies and perpetual rain, back to work, work, and more work. I have wanted to sit down and share some recipes with you but…well work has been in the way.

So to get things rolling again I thought I would start with something simple – a dish that can serve as breakfast, a snack, an appetizer, or even dinner. This is something my aunt would make when we were over at her house. It’s healthy. It’s easy. And it’s pretty darn good.

Edjeh

Edjeh is essentially an herb omelette or frittata. There are only a handful of ingredients: eggs, parsley, scallions, and garlic. Just a little chopping, a little beating, and patience with a skillet are all you need.

Makes about 8, 2-inch diameter “edjeh-ettes” or one 9-inch skillet’s worth.

4 eggs, 2 bunches of parsley (roughly chopped), 4 scallions (chopped), 1 clove garlic (minced), Salt and Pepper to taste,
1 tablespoon butter

Edjeh is green. Green eggs and ham!!! Finally I can imagine what real green eggs would look like!! Parsley is the key. First beat the eggs in a medium bowl. Then add the chopped parsley and scallions. The mixture should essentially be more greens than eggs. If your bunches of parsley aren’t that big, then consider adding a third bunch. Then add the garlic, salt and pepper. Melt the butter evenly in the skillet over a medium heat. Add the egg-parley mixture and swirl it around so that it’s evenly spread. Wait. The egg will cook at the bottom of the skillet first because it’s heavier. Once the bottom has lightly browned, flip it over and cook the other side.

When it is lightly browned and firm on both sides, remove it from the heat. You can cut it into squares with a knife or you can get a little fancy and use circle or any shape cookie cutters. Serve with some pita bread and pickles (toorshi of course) and be happy.

Monday, December 10, 2007

Mezze II - Tabouleh

Hands down, tabouleh is my favorite salad. It is what I want when it’s too hot out to even think about chewing, what my body will accept after a day or two of heavy holiday eating, and what I crave at least once a week. Scooped up with a crisp leaf of Romaine, every bite is filled with parsley, mint, bulghur, tomatoes, lemon and mild spices. Oh so good.

My love for this salad makes me very particular about it. Like many other mezze items, tabouleh has its variations based on culture. And now, due to its popularity, restaurants and markets make their own versions of what they call “tabouleh” which frustrate me. Cutting back on the cost of parsley, these little pre-packaged cups often are mounds of oily bulghur with flecks of parsley and tomato. No, no, no, no, no.

Yes it takes time, but tabouleh should be made the right way. It should be green, a beautiful green, with small chunks of tomato and flecks of beige, and a balanced dressing of lemon, olive oil, garlic, and spices. Do it right and oh how your body will appreciate it.


The Real Lebanese Tabouleh

(recipe handed down to me from Mom)

Ingredients

Serving 4

2 bunches of fresh parsley (curly preferred)
1 handful of fresh mint
1 medium tomato
2 green onion
1 small cucumber (optional)
3 tablespoons fine bulghur (#1)
1 lemon
1 clove garlic, crushed
1 tablespoon olive oil
¼ tsp allspice
¼ tsp cumin
¼ tsp red chilli pepper or paprika
½ tsp salt

There is a lot of chopping involved in this dish making this dish easy but definitely not a quickie.

Before washing the parsley and the mint, de-stem them. Picking off the leaves when they are dry makes the job much easier. Once done, rinse off the leaves well and then mince them. You want very small pieces. A great tool to chop parsley, or any herb for that matter, is the berceuse or mezzaluna (also called a triangle). I learned about this amazing tool through Chocolate & Zucchini, and ran to E. Dehillerin to pick one up that same week. You can get a fancier one from here.

Ok. So once you’ve minced the parsley and mint, move on to the tomato. Dice that into tiny pieces too. Do the same with the cucumber if you’re using it. Pile everything into a bowl as you go. Add the bulghur, the juice of half a lemon, the olive oil, the crushed garlic, and the spices. Toss it well and let sit for at least 15 minutes. The bulghur has to absorb all the liquids and soften. This isn’t a crunchy salad. I recommend letting it sit for 30 minutes or more so that all the flavours are absorbed into settled nicely.

Sunday, December 9, 2007

time for something sweet

I don’t eat enough fruit. You rarely see me pick up an orange and start peeling it for dessert. I try, oh how I try to be healthier, to boost my vitamin intake with actual vitamin-filled fruits instead of “supplements.” I go on mad spending sprees and stock up. Such a shame. So many apples and bananas sit in the fruit bowl turning brown and mealy, and oranges start to wrinkle (yes it’s possible). So sad.

I could blame it on my upbringing but it would be a lie. My father always has an apple in his hand. My mother is always pushing watermelons and oranges on us like it was the latest flavor from Ben and Jerry’s. I just never went for it – even though I actually like how they taste.

I can’t explain it. But I am trying to fight it.

So I am taking baby steps. I am fooling myself into eating more fruit. I hide it in salads, tuck them into sandwiches, roast them up with all kinds of meats – chicken and figs, pork and apples, and of course bake them. Pies and cakes are my primary sources of fruit intake. Banana cake, apple pie, strawberry tarts, and my favorite afternoon energy boost – l’oranais. OK. So I know they have lost almost all their nutritional value through the baking and sugaring process, but let me dream won’t you.

My latest favorite is the Gateau aux Poires, or the less romantic name - Pear Cake. With all the pears at the market I couldn’t resist hoarding some at home. A few days later I realized I better use them quick or else…. And here is what I discovered and have made again and again before the pears disappear. The basic recipe is from a simple cookbook I was given when I first moved here. I adapted it to add more flavor. The pears practically melt into the cake but not completely so that you bite into a delicious warm chunk here and there. It is important to use flavorful, ripe pears, such as Bosc. I added cinnamon and vanilla to give it a warmer, deeper flavor, and the brown sugar gives it a little caramelisation but not too much so that it’s not a super-sweet cake.

Gateau aux Poires (Pear Cake)

Adapted from « Le bonheur est dans la cuisine » edited by Clorophyl

Ingredients

250 g / 2 cups cake flour****
125 g / 1 stick butter, softened
150 g / ¾ cup sugar
3 medium eggs
4 ripe pears (Bosc are good)
1 tsp baking powder
1 tsp cinnamon
½ tsp vanilla
1 tbsp brown sugar

Preheat oven to 350 F / 180 C.
In a mixing bowl, cream the butter and the sugar. Add the eggs (one by one) and the vanilla. Mix them in well with the butter-sugar. Sift together the flour, baking powder and cinnamon. Add them to the batter little by little, just until incorporated in. (Read italicized section below.) Don’t over-stir it. I didn’t know this before, but I learned from an aunt that once the flour is in the batter, you are supposed to stir only in one direction.

Set the batter aside.

Peel, core and slice the pears lengthwise into roughly ½ inch-thick pieces. Butter the bottom and sides of a cake pan, and then cover with a sheet of pastry paper. If you have a good non-stick pan, you can probably skip the buttering, but I like to make sure. I used a 22 cm (8 ½ in.) springform pan. Pour the batter into the pan (onto the pastry paper). Layer the pear slices artfully (in a circular pattern, flower patter, as you wish) on top of the batter. Sprinkle the top of the cake evenly with the brown sugar.

Bake for 30-45 minutes. If the top of the cake is browning to quickly – cover with a tent of foil to avoid burning the top. Test doneness by inserting a toothpick in the center of the cake. If it comes out clean – then it’s done.

To get a bit of a crunch to the cake, let the cake cool for 5-10 minutes, take it out of the pan, flip it over placing the top onto the pastry paper this time and put it back in the oven (upside down) for maximum 10 minutes.

Goes great with vanilla ice cream.

**** If you are making this recipe in the US, the flour there is different so you have to adjust the measurement. I have not tested this myself but read that you should reduce the amount by 1/4 when using French recipes in the States. I used cake flour which is much lighter than all-purpose flour. If you want to use all-purpose flour then reduce the amount by at least half. Give it a try and let me know how it turns out. As recommended add the dry ingredients a little at a time until it's incorporated and has a slightly lumpy but wet consistency. It should look like all cake batters and not be very thick. Good luck!

Tuesday, December 4, 2007

Mezze Series I : Hummus

Let's get down to the basics.

If you have any Middle Eastern roots, have traveled through the region, or been to any party of hosts who are of Middle Eastern origin then you have had meals that start with mezze. Mezze is like the appetizer portion of a meal. It is made up of a variety of usually pita-dippable spreads and salads that should be served family style. Often they serve as a meal itself.

Hummus is a requisite for a complete mezze. It is also the best known and the quickest to prepare.

Hummus


When I was in Tel Aviv last year, colleagues took me to a hummus restaurant. This type of restaurant serves only hummus. They offer a series of variations to the concoction - simple hummus with a little bit of olive oil, with a topping of whole chick peas sautéed or baked with spices, and even with a super hard boiled egg (the kinds they let simmer over a burner all through shabat). Given that hummus is one of my favorite foods, I was pretty happy at that restaurant.

The last time I was in New York, I noticed a few hummus bars opening up in the Upper West Side. This comes as no surprise since hummus has been a trendy food in the States for some years now. But if I hear Rachel Ray or Bobby Flay call any bean puree hummus one more time....

Hummus is basically chickpeas (aka garbanzos, pois-chiches) pureed with tahine (sesame paste), olive oil, garlic, lemon and cumin. And every hummus maker and eater has their own preference of how much each ingredient should stand out. Some people like it heavy on the garlic, some heavy on cumin, others like it very simple (just tahine and chickpeas please). Culture has a lot to do with it. For example, in Israel the hummus didn't have cumin in it and very little garlic. In Syria and Lebanon, however, these spices are absolutely necessary.

I like it flavorful but not overbearing. I will share my formula and you can give it a try as is. A bit of advice is to add in the ingredients in order of your comfort or taste. You add a little bit of the first ingredient, whizz, taste, if you can handle more, go to the next step. Second bit of advice, if you’ve got one (and if don’t you should consider getting one) use a hand immersion blender. They come in so handy for hummus, soups, and anything that needs to be pureed. I love it, especially since I don’t have space for blenders and food processors.

You can use dried chick peas and let them soak overnight then boil them. Or you can just pick up cans of pre-boiled chick peas and have them ready and waiting in the pantry for spur of the moment hummus. Yes, it might taste better if you boil the chick peas yourself - but I really don’t think the taste difference is worth all that extra time and preparation. I should warn you now – I am not that kind of cook – the kind that has to do everything form scratch. No thank you. I’d rather go for a walk, have a little more time with friends, take an extra 10 minutes in bed before getting up….

Ingredients
Serving 4 for mezze or 2 for lunch

1 16 oz (425 ml) can of chickpeas / garbanzos / seeser /pois-chiches
1 ½ tbsp tahine (easily found in most major supermarkets these days, but you can also find it at Middle Eastern specialty stores)
1 tbsp olive oil plus for garnish
2 crushed cloves garlic
Half a lemon
1 tsp cumin
½ tsp salt

Drain the can of chick peas, rinse them and then drop them in a pot of boiling water for 2 minutes. Drain the chickpeas and rinse again. Let them cool. This will cut down some of the “bean” effect but if you don’t have the time for the boiling and cooling part (5 minutes), at least rinse them out well.

Put the chickpeas in a medium mixing bowl. Add the tahine, olive oil, garlic, lemon, cumin and salt. Remember, you can always add more of each later according to your taste, so start out by adding half of the ingredients. Puree until you get a nice spread-able, dip-able paste. Taste and add more of each ingredient as you see fit. Experiment until you get the taste you like. If the hummus is too thick, add a tablespoon of water.

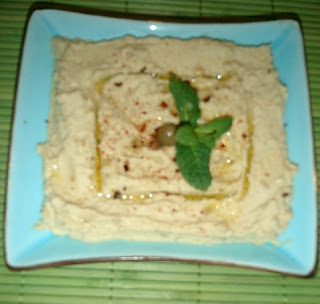
Spread onto a plate or a shallow bowl. Garnish with a swirl of olive oil, sprinkling of cumin and red pepper, and an olive or the top of a sprig of mint in the center. Serve with pita bread. Smile.

Saturday, December 1, 2007

Comments please

It has come to my attention that the option to make a comment was limited to Google subscribers. I fixed that. So now anyone can make a comment...you can even be anonymous if you want.

Please let me know what you think of the recipes, share your thoughts or memories of these foods, share some tips or how you might prefer to make things.....

As it is open for all to see, please be respectful.

Thanks for reading!

Oh -- and I also added a service (to the right - FeedBlitz) that is supposed to email you whenever I add a post. Take advantage of it if you wish.